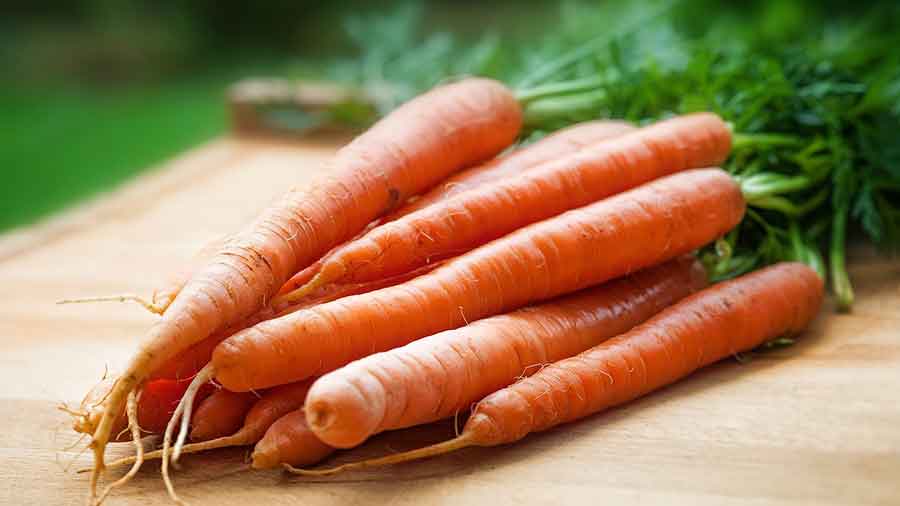
One of the most common wastes in the kitchen is carrot peels. How many times do we just throw away the peels in the trash? Well, if you have a garden at home, you can use kitchen wastes such as carrot peels as fertilizers for your plants.
In my container garden, kitchen wastes are actually one of my primary sources of organic fertilizers. Is carrot peel good for plants? Carrots are rich in potassium. Potassium is needed by plants to produce more flowers and fruits. It helps plants in reaching maturity by playing a big role in the absorption of water and nutrients from the soil.
The Role of Potassium in Plant Nutrition
Potassium is one of the primary nutrients needed by plants. The 3 primary nutrients that are essential to the growth and reproduction of plants are Nitrogen (N), Phosphorus (P), and Potassium (K). Nitrogen is for the production of chlorophyll. It makes the leaf green.
If the leaves of a plant turn yellow, it is a sure sign of nitrogen deficiency. Phosphorus is responsible for the growth rate of the plant. It helps the plants grow by ensuring proper root development.
Potassium, on the other hand, is responsible for:
- better photosynthesis
- absorption of water and nutrients
- flower and fruit production
- making the plant strong and sturdy
- strengthening the plant immune system
- ensuring bigger and more tasty fruits
Actually, aside from potassium, we can also get small amounts of magnesium and calcium from carrots. Both magnesium and calcium are secondary nutrients because plants need them in smaller amounts as compared to the primary nutrients.
According to Mississippi State University, magnesium is the central core of the chlorophyll molecule in plant tissue. Thus, if Mg is deficient, the shortage of chlorophyll results in poor and stunted plant growth. Magnesium also helps to activate specific enzyme systems. Enzymes are complex substances that build, modify, or break down compounds as part of a plant's normal metabolism.
The primary function of calcium in plant growth is to provide structural support to cell walls. Calcium also serves as a secondary messenger when plants are physically or biochemically stressed.
Burying the Carrot Peels in the Soil
Like all organic matter, carrot peels can simply be buried and turned into compost. This process involves good microorganisms in the soil breaking down the organic matter. As the microbes break down the carrot peels, it leaches the potassium into the soil which will then be absorbed by the plant.
However, one downside to this is the time it takes for the carrot peels to decompose. It could weeks or months before the carrot peels begin to give up their precious potassium.
Digging into the soil also poses a problem. You could end up destroying the roots while digging. I would not advise this in container gardening.


Scattering the Carrot Peels on the Soil
Organic matter tends to decompose faster when exposed to air. Scattering the carrot peels on top of the soil can actually be a good idea. To fasten the decomposing process, just cut or chop the peels into smaller pieces. Again, the presence of good microorganisms in the soil will break down the carrot peels in order for the potassium to leach into the soil.
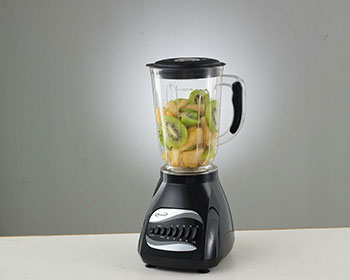
For even faster results, you may use a food processor or blender to grind the peels into a pulp. Add a bit of water to make an even finer texture. To apply it, I just pour it gently into the soil. Again, there is a downside to this process.
When scattering vegetable or fruit material on the soil, you attract snails and slugs. They love to feast on these tasty fertilizers. Snails and slugs are also good at eating the soft leaves and stems of your plants. A few hours of snails eating your plants could kill them.
Be sure that when you scatter carrot peels on the soil, there are no snails and slugs in the area. They are active during the night so you might not have a chance to catch them.
Making a Carrot Tea Fertilizer
A safer way to use carrots as fertilizer is to make them into tea. Well, technically it is called an infusion.
When you pour boiling or very hot water on fresh or dried parts of a plant and let it soak or steep for a minute or two, you’re generally preparing a tea. In this case, we will be soaking the carrot peels in water. But to get the most benefit out of the carrot peels, you may need to let it steep longer.
When you do this, you’re now making an infusion. The main idea here is to let the water absorb the potassium in the carrot peels.
Here are the steps in making a carrot tea fertilizer:
- Wash the carrot peelings first to remove excess dirt. There may be bad microorganisms present in the dirt which could contaminate the mixture and may harm your plants.
- Chop the carrot peelings into tiny bits. You may also include the carrot itself aside from the peelings. A medium-sized carrot is enough to make a 1-liter liquid fertilizer. You may also use a food processor or blender to achieve a finer texture. The smaller the carrot pieces, the more potassium we can get from them.

- Place the carrot slices into a container. A 1-liter plastic soda container is a good option. Just make sure that the container can be sealed tightly. We don’t want any insects laying their eggs on the liquid.
- Fill the container with water. You may use regular tap water here. Seal the container properly.
- Let it sit for 24 hours. Store it in a cool, dry place away from direct sunlight.
After 24 hours, it is now ready to apply as fertilizer. We can use it on all kinds of plants, on leafy vegetables, especially on flowering and fruiting plants. To apply, just filter out the solid particles and use the liquid to water or drench your plants with it.
The solids can be thrown into your compost bin if you have one. If not, just simply scatter it on the soil. Just be careful with the snails and slugs.
Making Fermented Fruit Juice For a Much Better Fertilizer
Using carrots in the procedures mentioned above may not be enough for your plants. Nonetheless, it is better than nothing. Plants will grow healthier by watering them with carrot tea instead of just plain water. If you are really serious about your plants’ health, then it’s time to take your carrot peelings into overdrive.
When we simply soak our carrots in water, we are not completely extracting all the potassium inside the carrots. To fully take advantage of the potassium found in the carrots, we need to do a process that involves fermentation.
What I am sharing here is a procedure in which we extract potassium by using good microorganisms. This will ensure that we get all the nutrients from the carrots.
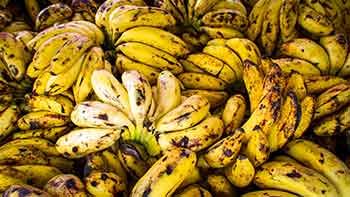
What I usually do is to gather all fruits and fruit peelings that are rich in potassium such as bananas, papayas, apples, and of course, carrots.
Aside from the fruits, you will also need molasses. An alternative to molasses is brown sugar.
Basically, the procedure is to soak the fruits in molasses. The good microbes will then break down the nutrients found in the fruits while using the molasses as their source of food.
Here are the steps in making the Fermented Fruit Juice (FFJ). I also wrote a much more detailed blog about this type of fertilizer. You can check it out here.
Step 1: Slice the organic materials into small pieces and put them in a large bowl. You may chop them, or ground them using a mortar and pestle. The smaller they get, the faster will be the fermentation process. It also helps that when you slice it, their plant juices will ooze out, which will then mix with the molasses.
Step 2: You can add in the molasses in this step and mix them with a spoon or a spatula. Mix for about 5 minutes. However, to speed up the process, you can use a blender. Place the chopped leaves in the blender. Add in the molasses.
The ratio is 1:2. For 1 every part of molasses, use 2 parts of organic material. If you have 200 grams of organic materials, you need to add 100 grams of molasses. Blend until you get a smooth texture.
Again, if you don’t have molasses, you can use brown sugar instead. The juice or the moisture from the plant material will mix with the brown sugar, producing a “syrupy” texture.
Step 3: Transfer the mixture to a clean container that can be closed with a lid. I am using a plastic soda bottle for this. It may be better to use a wide-mouthed container so you can mix it easily. Seal the container with a lid, but make sure not to seal it tightly.
The fermentation process will produce gases. Pressure will build up inside the container if the gases cannot escape. This might cause the container to explode. To make sure this won’t happen, open the container daily to let the gases out and at the same time, mix the concoction with a clean spoon or spatula.
Step 4: Wait until the fermentation process is complete.
The fermented fruit juice concoction is ready to use after 1 week. However, some materials may not be completely broken down yet. When the beneficial microbes breakdown the organic matter, it turns it into liquid.
It is better to give it more time to break down. In my case, I like to wait for a month before I use it. But 3 weeks is also ok, especially if the materials are finely chopped. The ideal scenario is when all the organic matter is completely liquefied.
Harvesting the Fermented Fruit Juice
Once you are ready to harvest the fermented fruit juice, check first if the entire procedure was successful. The best way to check if the concoction is a success is by smelling it. When you open the container, it doesn’t have that foul, rancid smell.
To harvest your fermented fruit juice, simply filter out the remaining solid particles. You may use a cloth or a strainer and transfer all the liquid to a clean container. The remaining solid particles can be added to your compost.
If you don’t have one, simply sprinkle them on the soil around the plant. This process is called topdressing. Because molasses is a natural preservative, you can use this fertilizer for up to a year. Just make sure to keep it in a clean container to avoid contaminants.
Also, remember that the fermentation process may still be ongoing. Don’t try to close the lid tightly because the microbes may still be releasing gasses that could build up pressure inside the container. It is good to open the lid maybe twice a week. Always store it in a cool, dry place. I just store it under the sink.
Fermented Fruit Juice Used as Foliar Fertilizer
The best way to apply the fermented fruit juice to your plants is to use it as a foliar fertilizer. Foliar feeding is when the fertilizer is applied directly to the leaves of a plant, usually through spraying.
With foliar feeding, the nutrients are absorbed directly through the leaves of the plant. The leaves absorb the nutrients through the stomata. It is best to spray the fertilizer in the early morning or late afternoon. This is when the plant’s stomata are open. To use it as a spray, you need to dilute it first in water.
The proper ratio is 10 ml of fermented plant juice per 1 liter of water. This is roughly 2 tablespoons per liter of water. Mix thoroughly before spraying. Spray twice a week.
The fermented fruit fertilizer is rich in potassium so it is best to use it in the flowering and fruiting stage of the plants.