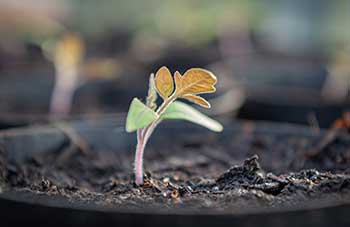
Tomato leaves are supposed to be green. If they start turning purple, maybe it’s time to ask yourself why this is happening. The purplish color may be more observable in the bottom part of the leaf.
So why are your tomato leaves turning purple and how do you fix it? In most cases, it is the lack of phosphorus that is causing the tomato leaves to turn purple. In some cases, it could be a case of cold weather. If your tomato plants are just in the seedling stage, it could just be a normal phase.
Whatever the reason may be, it is important to observe if the purplish color eventually turns to green. If the situation spreads to the other leaves and they start to wilt and drop from the main stem, then it is time to take action. Failure to remedy this problem will eventually cause the plant to die.
Purple Leaves are Quite Normal in the Seedling Stage
Like most of you, I like to grow tomatoes from seeds. There is a sense of greater satisfaction when you see the seeds start to sprout, as compared to buying tomato seedlings. When the first couple of leaves appear, they are usually colored green.
However, in some cases, whatever the variety of tomato is, the seedling may not have fully developed its plant systems yet. When they have not yet developed their respiratory and circulatory systems, it is normal to see purplish leaves and stems. This could also be true to other plants, such as pepper and cucumber. This condition should quickly disappear in a few days or maybe a week.
It is ok to just let the seedlings grow out of this stage. You may be doing more harm than good if you try to intervene at this stage. If more than 2 weeks have passed and the leaves are still purple, it might be time to look for other factors. Also, be wary if there are already about 6-8 true leaves and they still have a purplish hue.
Cold Weather Affects Nutrient-Absorption
It’s not really about the cold air, but it’s more about the cold soil that affects nutrient-absorption. Temperatures below 60 degrees F affects the ability of the plant to absorb the nutrients from the soil. Some varieties of tomatoes are not really suited for cold environments.
The problem can also be aggravated when you drench the plants with cold water. If this is the case, then simply transfer the plant to a warmer area. That is if you planted it in a pot or container. Be sure to keep the temperature anywhere from 65-80 degrees F.
It may also be a good idea to expose it to full sun for at least 4 hours a day.
Overwatering Can Cause Leaf Discoloration
Plants need water. Plants look wilted when they don’t get enough water. This is because it is the water that moves the nutrients and minerals from the roots to all the other parts of the plant. However, overwatering is also very harmful to plants.
When there is too much water, plants are drowning. When the roots are too wet, the air underneath the soil is not properly circulated. This stops the roots from absorbing the nutrients from the soil. When this happens, the leaves won’t be able to get the nutrients they need, causing them to turn yellow or purple.
When the roots are completely soaked with water for long periods of time, it will cause the rotting of the roots. If this is not checked early on, the plant will eventually die.
To fix this, simply stop watering the plant. Tomatoes don’t really like too much water. Always check the soil before watering water only if the soil is dry. This is a bit tricky because the soil may look dry on top but underneath it could be water-logged already this all depends on the type of soil you have.
Clayish soil exhibits this property. It tends to hold water for a long time. It would be better if you use well-draining soil for tomatoes. You may use a commercially-available potting mix as they tend to be well-draining. You may also add soil amendments such as coco peat, sawdust, wood chips, and sand, to improve the quality of your soil.
Lack of Phosphorus Turns Leaves Purple
Plants need 3 basic, important nutrients. These are nitrogen (N), Phosphorus (P), and Potassium (K). When the tomato leaves start turning yellow, they might not receive enough phosphorus.
Phosphorus is responsible for the overall growth rate of the plant. It does this by developing the plant’s roots so it could absorb nutrients from the soil efficiently. A common symptom of phosphorus deficiency is when the lower or bottom part of the leaf starts turning purple. This extends to the veins after some time.
When this happens, supply the plant with fertilizer that is rich in phosphorus.
Synthetic plant fertilizers usually have a label that indicates the number of nutrients they contain. A 14-14-14 fertilizer is a complete fertilizer which means it has equal percentages of nitrogen, phosphorus, and potassium.
A 46-0-0 fertilizer is all nitrogen without phosphorus and potassium. Use a complete fertilizer or a fertilizer high in phosphorus content. Natural fertilizers high in phosphorus include rock phosphate, bone meal, and even eggshells.
If you want to go organic, then let me share with you how I make organic fertilizers at home that is rich in phosphorus.


Eggshell Calcium Phosphate
A good quality chicken eggshell contains approximately 2.2 grams of calcium in the form of calcium carbonate. About 95% of the dry eggshell is calcium carbonate. However, aside from calcium, the average eggshell also contains small amounts of phosphorus.
This fertilizer is what I use when my tomato plants start to flower.
To extract the calcium and phosphorus from the eggshells, I use the acid found in vinegar. I wrote a blog about this. You can read it here. The downside of making this fertilizer is that it takes a month to fully extract the nutrients. Although, you may already “harvest” the fertilizer after 2 weeks.
This is a step-by-step process of how I make an eggshell calcium phosphate fertilizer. I also have a more detailed explanation about eggshell fertilizers on a separate blog. You can check it out here.
Step 1. Clean the eggshells
First, wash the eggshells properly. Remove all excess egg yolk and inner skin because it may contain contaminants or harmful bacteria that may damage the plants. Just place the eggshells in a basin full of water and brush away all dirt. Afterward, let it dry out in the sun.
Step 2. Heat the eggshells
Crush the eggshells first before heating them. Next, we will heat the dried eggshells in a pan over low heat. We are going to stir it constantly until the color becomes brownish. Why do you need to heat the eggshells, you may ask? Well, it is not really necessary but if we will not heat it, we can only extract calcium.
Remember, there are also other nutrients found in the eggshells. If we heat it, we can also extract phosphorous. Phosphorous helps in the plant’s root development, which enables it to absorb nutrients efficiently. Do not burn or overcook the eggshell. The entire cooking process may last for 20 mins.
Set aside and let it cool.
Step 3 Soak eggshells in vinegar
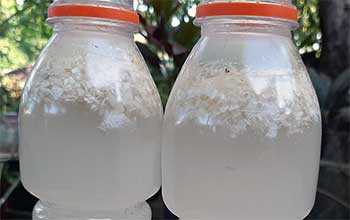
After it has cooled down, we are now ready to extract the calcium and phosphorus. To do this we need an acid. I just use vinegar as my acid. The vinegar I’m using is cane vinegar with 4.5% acidity. Any kind of vinegar will do as long as the acidity is 3% and above.
Put the crushed eggshells in a container. I’m using those PET (polyethylene terephthalate) bottles they use in beverages. Pour the vinegar into the container. The proper ratio is 1:9. For every 1 part of eggshells, use 9 parts vinegar. Do not cover it yet.
Step 4. Let the eggshells and vinegar react
If you have followed the procedure correctly, the moment you pour in the vinegar, there will be an instant bubbling reaction.
The acid in the vinegar is now slowly extracting the calcium and phosphorus from the eggshells. This reaction could take a long time. It takes anywhere from 12-24 hours for the bubbling reaction to subside.
During this time, just cover the container with tissue paper or any porous material. This is to prevent dirt or insects from the mixture and also to let the air by-product escape.
Once it subsides, you can now cover the container with a lid.
Step 5. Wait for 3-4 weeks
The entire extraction process may take anywhere from 20-30 days. While waiting, keep the solution in a cool and dry place away from direct sunlight. Uncover the lid once or twice a week to let the air escape.
Applying the Eggshell Fertilizer
Once the extraction process is complete, remove the undissolved particles using a strainer. You may also transfer the liquid into a new, clean container. To use this calcium-rich fertilizer, you have to dilute the solution first in water.
The ratio is 10 ml per liter of water. Or about 2 tablespoons per liter. Spray your fertilizer directly onto the leaves. This process of spraying liquid fertilizer is called foliar feeding.
Foliar feeding is a technique of feeding plants by applying liquid fertilizer directly to the leaves. Plants are able to absorb essential elements through their leaves. The absorption takes place through their stomata and also through their epidermis.
Do this once or twice a week. Most people forget this, but also spray under the leaves. As a tip, water early in the morning or late in the afternoon. The leaves absorb the nutrients better because at these times, the stomata, which are the tiny openings or pores in plant tissue that allow for gas exchange, are open.
With proper storage, this solution may last up to six months.
Bone Meal Calcium Phosphate
Another rich and organic source of calcium and phosphorus is animal bones. It could be from pig, cow, or chicken bones. The procedure is more or less similar to making an eggshell fertilizer in that we use acid to extract the calcium and phosphorus.
Step 1. Clean and boil the bones
Remove any excess meat attached to the bones. The bones could either be fresh or cooked. After removing the excess meat, boil it for about 30 minutes. There may still be some meat residues attached so remove it after boiling.
Step 2. Grill the bones
Yes. Grill the bones over hot charcoal. Grill them until they become brown. Do not overcook it. Be careful not to char it. This will activate the calcium and phosphorus content in the bones so it can easily be extracted.
Step 3. Soak in vinegar
Prepare the vinegar in a separate container. The ratio is 1:9. For every kilo of bones, use 9 liters of vinegar. Soak the grilled bones in the vinegar and cover tightly. Store the container in a cool, dry place away from direct sunlight.
Step 4. Let it sit for 30 days
Always store it in a cool and dry area away from direct sunlight.
That’s it. After 30 days, filter out the solids because you will only be using the liquid part. To apply this as fertilizer, use the same method with the eggshell fertilizer. Dilute first in water. The ratio is 10 ml of fertilizer per liter of water.
Tomato Purple Leaf Disorder (TPLD) Could be Causing Purple Leaves
I would like to share what I’ve read about TPLD. The text below is taken from a document entitled PP259, one of a series of the Plant Pathology Department, University of Florida/IFAS Extension. Check this link for the full article about TPLD.
“The tomato purple leaf disorder (TPLD) has been observed in several tomato fields in Hillsborough, Manatee, and Miami-Dade counties since 2006. Initial symptoms appear between six and eight weeks after transplanting and could be somewhat confused with mild phosphorus (P) deficiency. However, nutritional analysis of leaves obtained from three affected locations revealed normal values for all essential nutrients, including P.
… TPLD tends to appear primarily on the upper leaf surface, without affecting the veins, and gradually spreads to the entire leaf surface…
…At 11 weeks after transplanting, the incidence of TPLD was less than 1 percent (one or two plants per 600 feet of row). However, four weeks later, incidence in the same field increased to more than 90 percent. An adjacent field under the same management practices, which was four weeks younger than the previous one, exhibited mild TPLD infestation with less than 25 percent incidence…
Tests for known pathogens of tomato using standard microbiological, serological, and nucleic acid-based methods were negative. However, preliminary studies suggest that TPLD is caused by an infectious agent, like a virus or viroid. The mechanism of transmission is still unknown…”
What this means is that even when phosphorus is abundant, the leaves still turn purple. However, the discoloration starts from the upper leaf surface, instead of at the lower surface. If this is a virus, then there really is nothing we can do about it.
This is what I call a worst-case scenario. In my experience, applying bone meal or eggshell fertilizers always solves the problem. So this problem may not be too common.
If this happens to your tomato plants, I would recommend removing the infected leaves and isolating the infected plant immediately.
In summary
When the leaves of your tomato plants turn purple, here is what you should do:
- When they are in the seedling stage, it may just be normal. Just allow the seedlings to grow on their own.
- When it is cold, transfer the plants to a warmer area. Check that the temperature is around 65-75 degrees F. Expose the plants also to full sunlight for at least 4 hours a day.
- Check soil moisture. You may be overwatering the plants. Stop watering and expose them to full sunlight. It may be time to use a better potting mix or add soil amendments.
- Your soil may be low on phosphorus. Apply phosphorus-rich fertilizer. For organic fertilizers, you may use bone meal, eggshells, or rock phosphate
- You may have a case of Tomato Purple Leaf Disorder (TPLD). Remove the affected leaves and isolate the plant immediately.